Record a slide show with narration and slide timings
Edwardo Barahona
May 18, 2020
- To get ready to record, select Record Slide Show on either the Recording tab or the Slide Show tab of the ribbon.
- Clicking the upper half of the button starts you on the current slide.
- Clicking the lower half of the button gives you the option to start from the beginning or from the current slide.
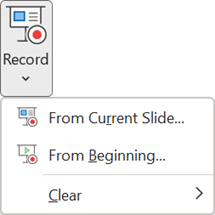
(The Clear command deletes narrations or timings, so be careful when you use it. Clear is grayed out unless you have previously recorded some slides.)
The slide show opens in the Recording window (which looks similar to Presenter view), with buttons at the top left for starting, pausing, and stopping the recording. Click the round, red button (or press R on your keyboard) when you are ready to start the recording. A three-second countdown ensues, then the recording begins. 
- The current slide is shown in the main pane of the Recording window.
- You can stop the recording any time by pressing Alt+S on your keyboard.
- Navigation arrows on either side of the current slide allow you to move to the previous and next slides.
- PowerPoint for Microsoft 365 automatically records the time you spend on each slide, including any Animate text or objects steps that occur, and the use of any triggers on each slide.
- You can record audio or video narration as you run through your presentation. The buttons at the lower-right corner of the window allow you to toggle on or off the microphone, camera, and camera preview.
To end your recording, select the square Stop button (or press S on your keyboard). When you finish recording your narration, a small picture appears in the lower-right corner of the recorded slides. The picture is an audio icon, or, if the web camera was on during the recording, a still image from the webcam. 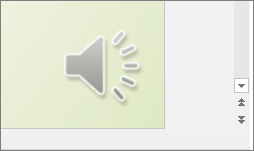 The recorded slide show timing is automatically saved. (In Slide Sorter view, the timings are listed beneath each slide.)
In this process, what you record is embedded in each slide, and the recording can be played back in Slide Show. A video file is not created by this recording process. However, if you need one, you can save your presentation as a video with a few extra steps.
The recorded slide show timing is automatically saved. (In Slide Sorter view, the timings are listed beneath each slide.)
In this process, what you record is embedded in each slide, and the recording can be played back in Slide Show. A video file is not created by this recording process. However, if you need one, you can save your presentation as a video with a few extra steps.
Recording tips
- Recordings are added to the presentation on a per-slide basis, so if you want to change a recording, you only have to re-record the affected slide or slides. Also, you can rearrange the order of slides after recording without having to re-record anything. This also means it's easy to pause for a break while recording a presentation.
- PowerPoint doesn't record audio or video during transitions between slides, so don't speak while advancing the slide. Also, include a brief buffer of silence at the beginning and the end of each slide to make the transitions smooth and ensure that you don't cut off audible narration while transitioning from one slide to the next.
- You can't record narration in PowerPoint for the web. Use a desktop version of PowerPoint to record your narration.
- You can adjust and edit the size of video and ink in edit view.
- If it's possible that your audience may use PowerPoint for the web to experience the recording, use the transitions that are supported by PowerPoint for the web (Cut, Fade, Push, Wipe, Split, Random Bars, Shape, Morph).
- Presentation recording works best with touch-screen PCs that have a web camera.
- Use video preview to make sure everything is set up correctly before recording.
- For slides that you want to record gestures (such as ink) on, make multiple copies of the slide so that you can easily record multiple takes. Then delete the extraneous slides when you're done.
- Record a few seconds of silence by turning off audio and video to advance after a set time.
- For higher quality, use an external web cam and/or microphone. Built-in cameras and microphones are suitable for most tasks. But if you want more professional-looking video, consider using an external web cam, if you're able. If you're using PowerPoint on a tablet or laptop and you're inking with a stylus, an external camera and microphone allows you to minimize stylus noise.
- As soon as you finish your first slide recording, play it back. Before you get too far down the road of recording your presentation, make sure your audio and video sound and look the way you expect.
1 out of 1 found this helpful
