The SSL VPN service is part of the VPN service on the CloudGen Firewall. Configure a listener for the SSL VPN on a public IP address and authenticate the users via a local or external authentication scheme. It is recommended to use signed SSL certificates to avoid SSL error messages when users access the SSL VPN portal. SSL VPN is supported for CloudGen Firewall F18 and larger, as well as all CloudGen Firewall Vx models except VF10.
You can also configure the usage of strong ciphers, which are special algorithms for performing cryptographic functions to negotiate security settings at a very high level of security.
Before You Begin
- An Advanced Remote Access subscription is required.
- Configure an external authentication server or NGF local authentication. For more information, see Authentication.
Step 1. Disable Port 443 for Site-to-Site and Client-to-Site VPN
- Go to CONFIGURATION > Configuration Tree > Box > Assigned Services > VPN-Service> VPN Settings.
- Click Lock.
- Remove the tick from the Listen on Port 443 checkbox.
- Click OK.
- Click Send Changes and Activate.
Step 2. Enable the SSL VPN Service

- Go to CONFIGURATION > Configuration Tree > Box > Assigned Services > VPN-Service > SSL-VPN.
- In the left menu, click SSL VPN Settings.
- Click Lock.
- Set Enable SSL VPN to Yes.
- Click Send Changes and Activate.
Step 3. Configure SSL VPN General Service Settings
- Go to CONFIGURATION > Configuration Tree > Box > Assigned Services > VPN-Service > SSL-VPN.
- In the left menu, select Service Setup.
- Expand Configuration Mode and click on Switch toAdvancedView.
- Click Lock.
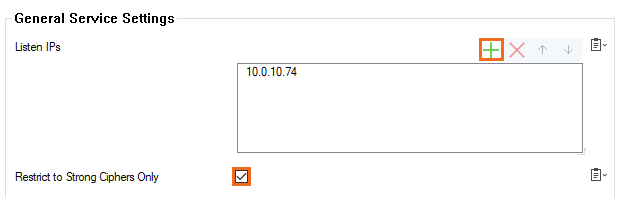
- Verify that the Listen IP for the SSL VPN service is correct, or c lick + to add a Listen IP .
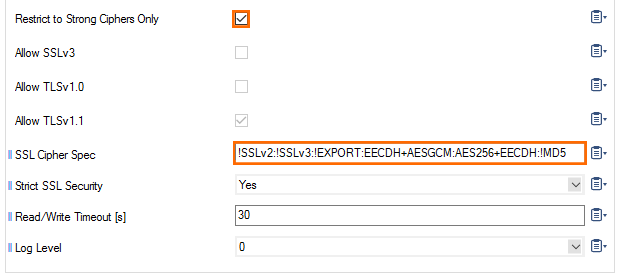
- (recommended) Enable Restrict to Strong Ciphers Only.
- (optional) Configure a custom SSL Cipher Spec string to be used by the SSL VPN service.
- Set Strict SSL Security to yes.
This setting might break access for older client SSL implementations. Disable if you experience problems when using older browsers.
Select the Identification Type:
- Generated-Certificate – The certificate and the private key is automatically created by the firewall.
- Self-Signed-Certificate – Click New Key to create a Self-Signed Private Key and then create the Self-Signed Certificate.
- External-Certificate – Import the CA-signed External Certificate and the External-Signed Private Key.
When importing an external trusted certificate, you must also import the certificate chain that includes intermediates and root certificate of the CA.
- Use Max Concurrent Users – Enable to limit the number of simultaneous users using the SSL VPN service.
- Max Concurrent Users – Enter the maximum number of users that can be simultaneously connected to the SSL VPN service.
- Session Timeout (m) – Enter the session timeout in minutes.
- Deny Remember Me – Set to yes to remove the Remember me check box on the login page.
- POST retry buffer size [MB] – Increase the POST buffer size for uploads over Web Apps which have connection issues.
S tep 4. Configure SSL VPN Settings
- Go to CONFIGURATION > Configuration Tree > Box > Assigned Services > VPN-Service > SSL-VPN.
- In the left menu, click SSL VPN Settings.
- Click Lock.
- In the Access section, set the Identity Scheme to your preferred authentication method, e.g., MS-Active Directory.
- Click + to add your access control policy to the list of Access Control Policies. For more information, see SSL VPN Access Control Policies.
- (optional) In the Dynamic App Super Users field, add user groups that should be allowed to enable, disable, or time-enable SSL VPN resources that are classified as dynamic apps.
- Customize the login messages and logos:
- (optional) Import a 200 x 66-pixel PNG or JPG image to customize the Logo.
- (optional) Enter a plain text Login Message. E.g, Welcome to the Barracuda CloudGen Firewall SSL VPN.
- (optional) Enter a Help Text (HTML). This text is displayed under the info menu after the user has logged in.
- Click Send Changes and Activate.
Troubleshooting
If the sslvpn log contains the following line: http_listener: failed to listen on @443 verify that no other service on the firewall is running on that port and that no DNAT access rules are forwarding TCP port 443 (HTTPS) traffic.
- Restart the SSL VPN service after updating or changing certificates:
- Set Enable SSL VPN to no.
- Click Send Changes and Activate.
- Set Enable SSL VPN to yes.
- Click Send Changes and Activate.
When using RADIUS authentication, the service assumes that one-time passwords can be used. This, in turn, disables the single sign-on functionality for at least the native app RDP. The result is that the system asks for the password again when connecting to the resource.
- Use a different authentication scheme (possibly in conjunction with RADIUS), or
- Set up a user attribute that is used for logging into the RDP, and have the user configure that after having logged into the portal. For more information, see How to Configure RADIUS Authentication .
The downside of the latter option is that the user will have to adjust the password here as well whenever it changes.
