If you want to monitor your home remotely with a security camera, using a wireless network camera is the most permanent way to do it. You can make do with a standard USB webcam (or use your iOS or Android device as a webcam), but wireless network cameras are easier to position and they’re designed for the task. In this how-to, we’ll walk through the process of setting up a wireless network camera and using it for home monitoring.
For this how-to, we decided to use the D-Link DCS-932L ($150) wireless network camera, which you can connect to your network via ethernet or 802.11n Wi-Fi. Of course, specific setup instructions differ from camera to camera, but we’ve found that many of the basic features that you’ll want in a wireless network camera are similar for most models.
Before you start configuring the camera, you should try to decide where to put it. The main limitation here is the power cord: You’ll have to place it fairly close to a power outlet, or you’ll have to use an extension cord–meaning that you probably won’t be able to position it in an elevated spot without leaving unsightly power cables dangling from your walls.
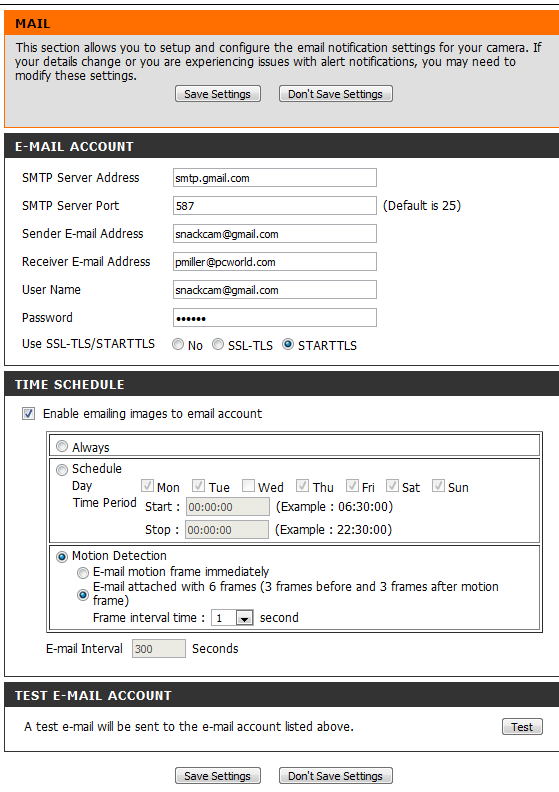
Next, let’s set up the camera’s auto-email feature. Click Mail on the left-hand side of the page to get to the configuration page. Here, you’ll need to find the right settings for your email provider–at right, I’ve filled out the settings for using Gmail’s SMTP server, which you can find at Gmail’s “Configuring other mail clients” help page. Next, check Enable emailing images to email account, and check the Motion Detection radio button to set the camera to email you images every time the motion detection sensor is set off.
Now you have a wireless network camera set up with basic surveillance features that make it perfect for monitoring your home, children, pets, or snack fridge at work. Have your own tips? Leave them in the comments!